03-12-2011, 08:40 PM
I thought I'd share a recent install job I just completed. It was a bit of a chore, but turned out well.
I was asked to install sound in 2 Proto2000 GP9s, and a speed decoder in another, and match them up so they would run well in consist.
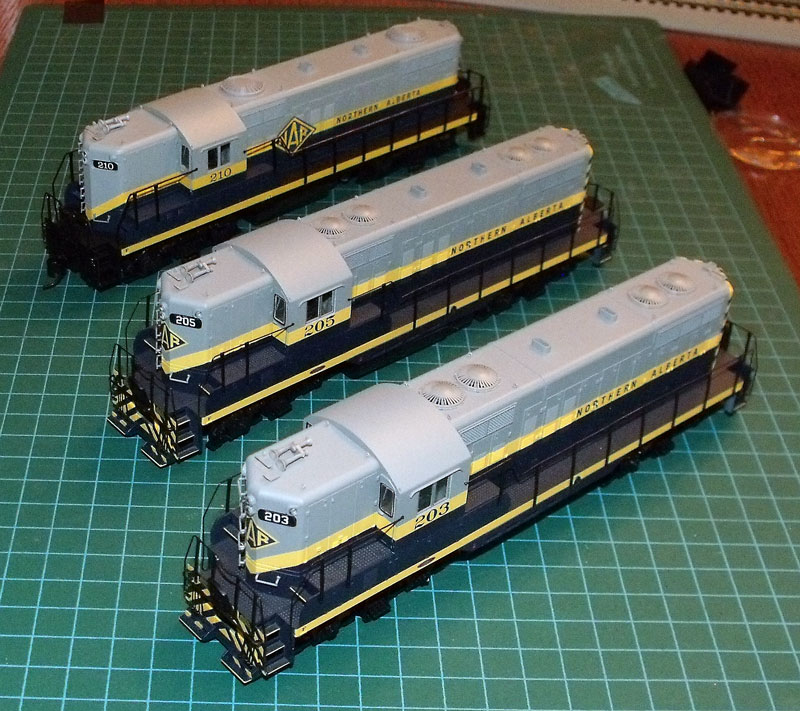
They are a nice-looking trio of Northern Alberta GP9's:

My go-to decoder for sound these days is the Soundtraxx Tsunami. I had an AT1000 and GN1000 567 on hand, so that's what I used. As for the third, rather than try to match speeds by using another brand, I thought I'd give Soundtraxx's MC1H102P8 decoder a try, since it uses the same motor-drive protocol as the Tsunami's.
I don't generally like doing sound installs on the P2K units because the weight is a single piece, screwed to the chassis. There's always some milling and cutting required to get things to fit. Even with the little mobile decoder, I needed to notch the weight at the top so the plug and decoder would clear.
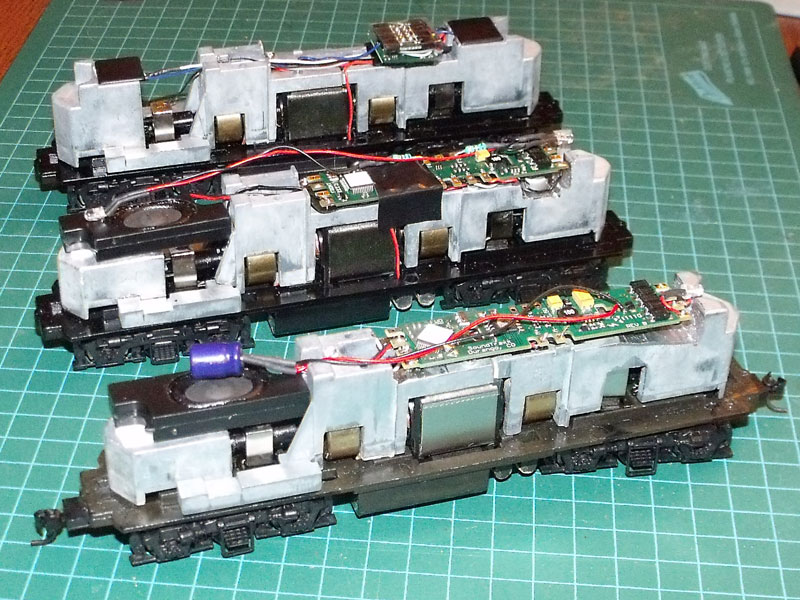
Here's how things looked after the dust settled:

Back-to-front are the mobile-decoder, the GN1000 and the AT1000 units.
The speakers are a relatively new product to me: Railflyer Model Prototypes SK-8701s. They're actually a laptop speaker, but they're a decent price, and sound pretty good. They come with a ported enclosure, and fit nicely inside a road-switcher hood.
For the sound units, I had to carve off a large chunk of the weight forward of the cab. I usually prefer putting the speaker in the rear of the units, but the way the Proto weight is made, it's simpler just to cut the top off the section over the front truck that to try and remove all that material in the back.
As anyone who's done a few of these installs knows, one of the big pains with a sound decoder is where to put the capacitor . With the GN1000, the caps are small and mounted on the board, but where they hang over the end of the motor over the flywheel on an Athearn Genesis, here they needed to have some space carved out of the weight for them. With the AT1000, the cap is floating around on the ends of its leads. I could have carved some more space out of the weight, but I realized it would tuck into the top of the cab, next to the clear plastic light/numberboard insert.
As well, the Tsunami boards are longer than the circuit board originally in the unit, so I had to carve some more space on the top of the weight. For both of the sound units, I kept one of the screws that held the original circuit board so that I could tie a wire to the chassis for the right-hand pickup (left hand is off the top of the trucks).
I replaced the blow-out-if-you-sneeze stock bulbs with Digitrax warm-white LEDs. I used 680 ohm resistors for the mobile decoder and the AT1000, but the GN1000 has 1.5 V outputs all around. I scratched my head for awhile before discovering that this decoder has a 14V function common lead so you wire the outputs as usual, and instead of running the blue common to the paired terminals, you run it to the 14 V common. One wierd problem with this decoder was that when I tried using the head/backup light outputs, the LEDs were always on... no response to F0. So rather than fuss around I moved them over to the FX5 FX6 outputs, and remapped F5 and F6 to F0 - they worked fine. Space was a bit tight with the AT1000 at the rear, so I folded the resistor under the end of the board, hence the extra space cleared in the weight there.
After several minutes of trying to hold my mouth the right way, I got the shells back on, and ran them. They sound pretty darn good, but oh my are they stiff The original grease in these units had turned into some sort of brown waxy gummy mess... I had to open the gear towers and swab it out, and I replaced it with white Teflon grease. Now they're a smooth trio.
I'm going to try to get some video of the 3 in operation, so we'll see if it does the sound any justice.
I was asked to install sound in 2 Proto2000 GP9s, and a speed decoder in another, and match them up so they would run well in consist.
They are a nice-looking trio of Northern Alberta GP9's:
My go-to decoder for sound these days is the Soundtraxx Tsunami. I had an AT1000 and GN1000 567 on hand, so that's what I used. As for the third, rather than try to match speeds by using another brand, I thought I'd give Soundtraxx's MC1H102P8 decoder a try, since it uses the same motor-drive protocol as the Tsunami's.
I don't generally like doing sound installs on the P2K units because the weight is a single piece, screwed to the chassis. There's always some milling and cutting required to get things to fit. Even with the little mobile decoder, I needed to notch the weight at the top so the plug and decoder would clear.
Here's how things looked after the dust settled:
Back-to-front are the mobile-decoder, the GN1000 and the AT1000 units.
The speakers are a relatively new product to me: Railflyer Model Prototypes SK-8701s. They're actually a laptop speaker, but they're a decent price, and sound pretty good. They come with a ported enclosure, and fit nicely inside a road-switcher hood.
For the sound units, I had to carve off a large chunk of the weight forward of the cab. I usually prefer putting the speaker in the rear of the units, but the way the Proto weight is made, it's simpler just to cut the top off the section over the front truck that to try and remove all that material in the back.
As anyone who's done a few of these installs knows, one of the big pains with a sound decoder is where to put the capacitor
 . With the GN1000, the caps are small and mounted on the board, but where they hang over the end of the motor over the flywheel on an Athearn Genesis, here they needed to have some space carved out of the weight for them. With the AT1000, the cap is floating around on the ends of its leads. I could have carved some more space out of the weight, but I realized it would tuck into the top of the cab, next to the clear plastic light/numberboard insert.
As well, the Tsunami boards are longer than the circuit board originally in the unit, so I had to carve some more space on the top of the weight. For both of the sound units, I kept one of the screws that held the original circuit board so that I could tie a wire to the chassis for the right-hand pickup (left hand is off the top of the trucks).
I replaced the blow-out-if-you-sneeze stock bulbs with Digitrax warm-white LEDs. I used 680 ohm resistors for the mobile decoder and the AT1000, but the GN1000 has 1.5 V outputs all around. I scratched my head for awhile before discovering that this decoder has a 14V function common lead so you wire the outputs as usual, and instead of running the blue common to the paired terminals, you run it to the 14 V common. One wierd problem with this decoder was that when I tried using the head/backup light outputs, the LEDs were always on... no response to F0. So rather than fuss around I moved them over to the FX5 FX6 outputs, and remapped F5 and F6 to F0 - they worked fine. Space was a bit tight with the AT1000 at the rear, so I folded the resistor under the end of the board, hence the extra space cleared in the weight there.
After several minutes of trying to hold my mouth the right way, I got the shells back on, and ran them. They sound pretty darn good, but oh my are they stiff
 The original grease in these units had turned into some sort of brown waxy gummy mess... I had to open the gear towers and swab it out, and I replaced it with white Teflon grease. Now they're a smooth trio.
I'm going to try to get some video of the 3 in operation, so we'll see if it does the sound any justice.


