Posts: 1,442
Threads: 22
Joined: Jun 2022
The Bank Job....
Printed out a full set of 5 sheets that make up the FREE Crystal Lake Bank (courtesy of the Illinois Historic Preservation Agency) - that'll be turned into the 1st National Bank in White Haven. I suppose because all of these buildings are free, they don't include a whole lot of extra pieces to build up the detail relief (around windows, doors, etc.), and you can certainly put together a flat face for each side of the building, but I'm used to Clever models with a bunch of layers that when applied, bring out architectural details and make the building more like a typical plastic model. You can still do that with these kits - you simply have to print multiple copies of the sheets, cut and paste while building from the interior. For instance, in order to give the windows the depth I like, I printed out 3 copies - the rearmost level has the lower sash, the 2nd level the upper sash and sash frames, the thrid level the window frame, and finally another layer for the window sill. In the photo below you can see where I've cut out the sash frames on the main wall, and the layer below that is glued and placed under the main wall to give more depth.
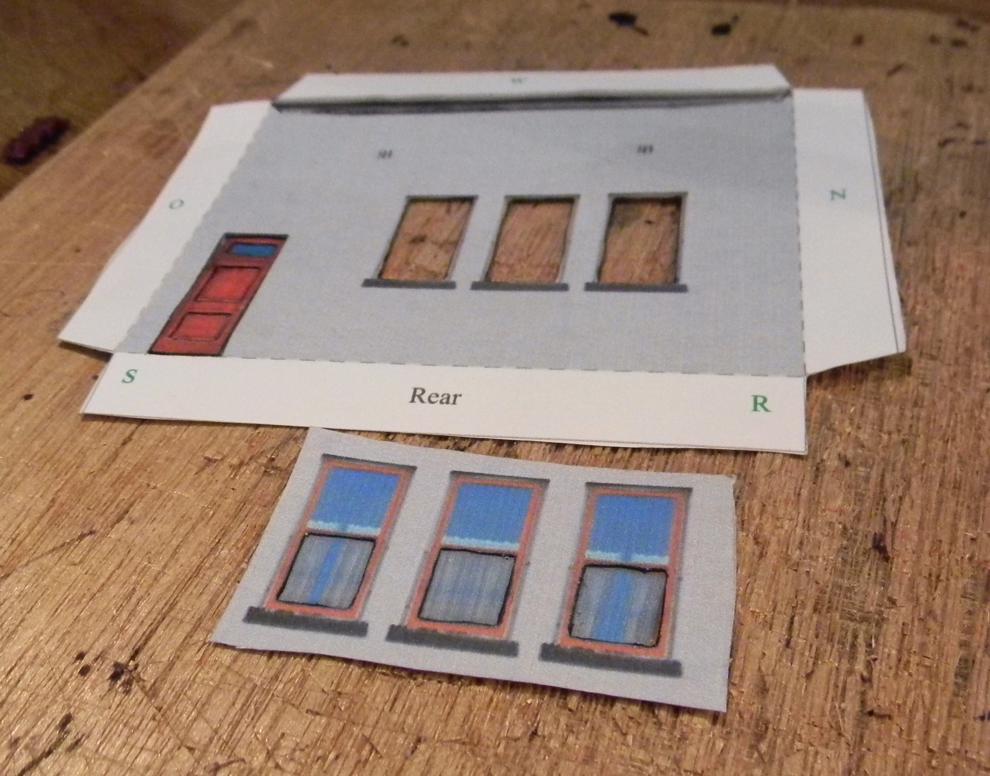
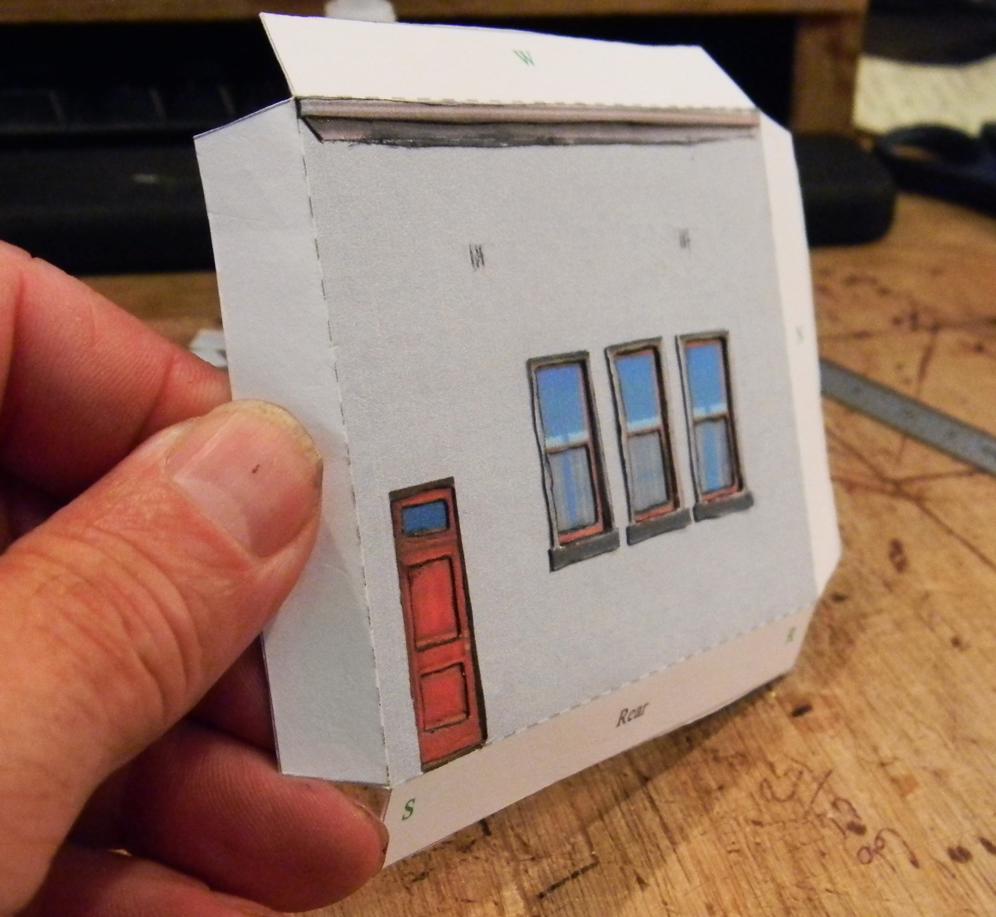
Cutting carefully, using a paint pen or a marker to coat each cut edge, and gluing can make your building sides a lot more realistic. If you want some shine to the windows, you can also attach clear cellophane tape on one of the layers (I didn't do that on the rear face of the bank, but I might to the front). One easy side done... The front has a good bit of gothic elements that will be a little bit of a challenge, but the right and left sides are about as easy as the back.
Posts: 11,123
Threads: 251
Joined: Dec 2008
Todd, I would never have thought of layers. That makes a lot of sense. This will be another one of your classics.
I am looking forward to this one.
Charlie
Posts: 1,442
Threads: 22
Joined: Jun 2022
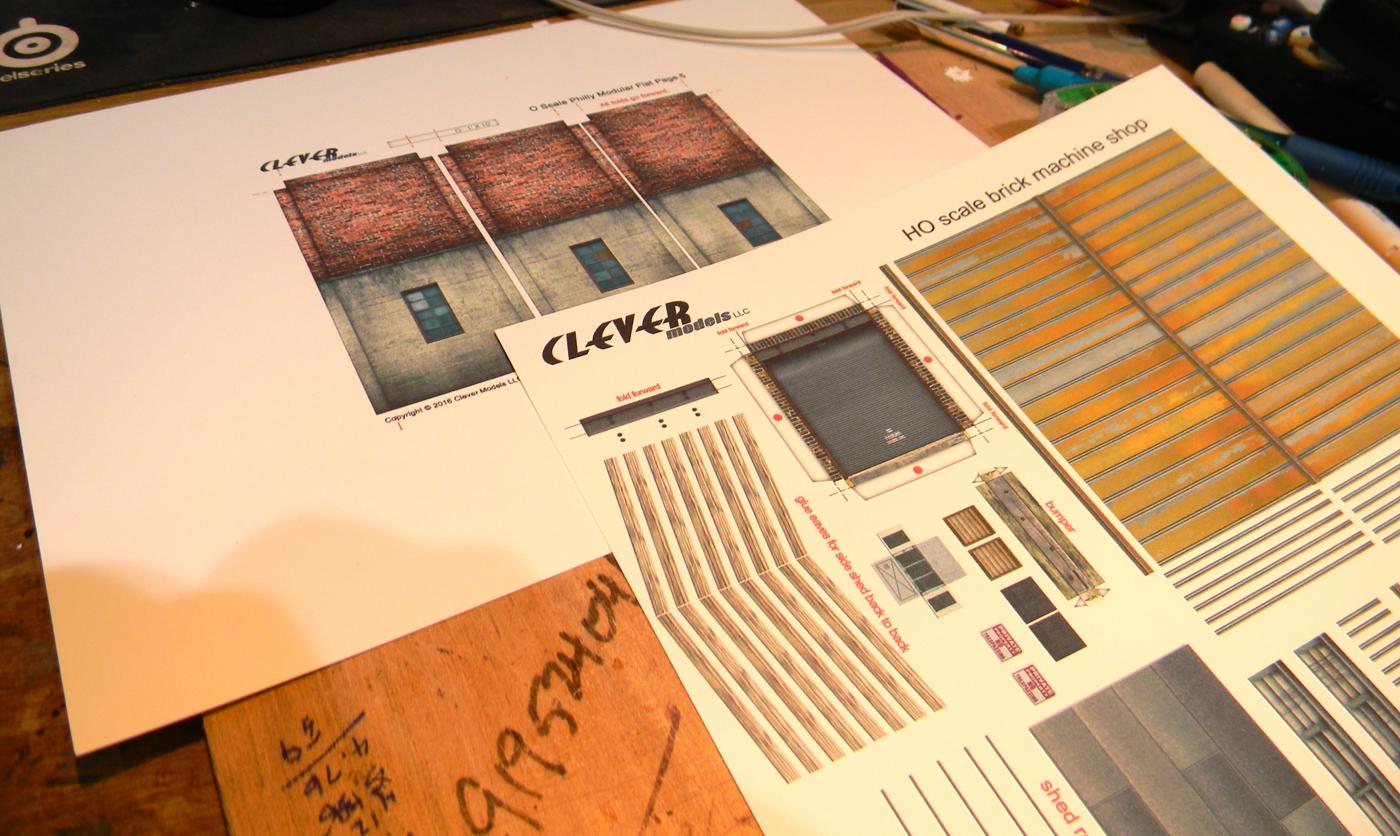
Yes, the layers add "depth" which is desirable in modeling 3D buildings. Unfortunately, adding that depth increases the number of prints you have to make and means the expenditure of much more time. The kits from Clever (photo of two of their pages below) tend to be walls and additional layers on the same sheet (the metal roof and the add-on layers for the center ridge cap and individual seams are good examples), but those aren't FREE....
Posts: 1,448
Threads: 35
Joined: Mar 2009
Looking good so far Todd.
Matt
Conrail's Blairsville Cutoff
Posts: 1,442
Threads: 22
Joined: Jun 2022
Thanks, Matt!
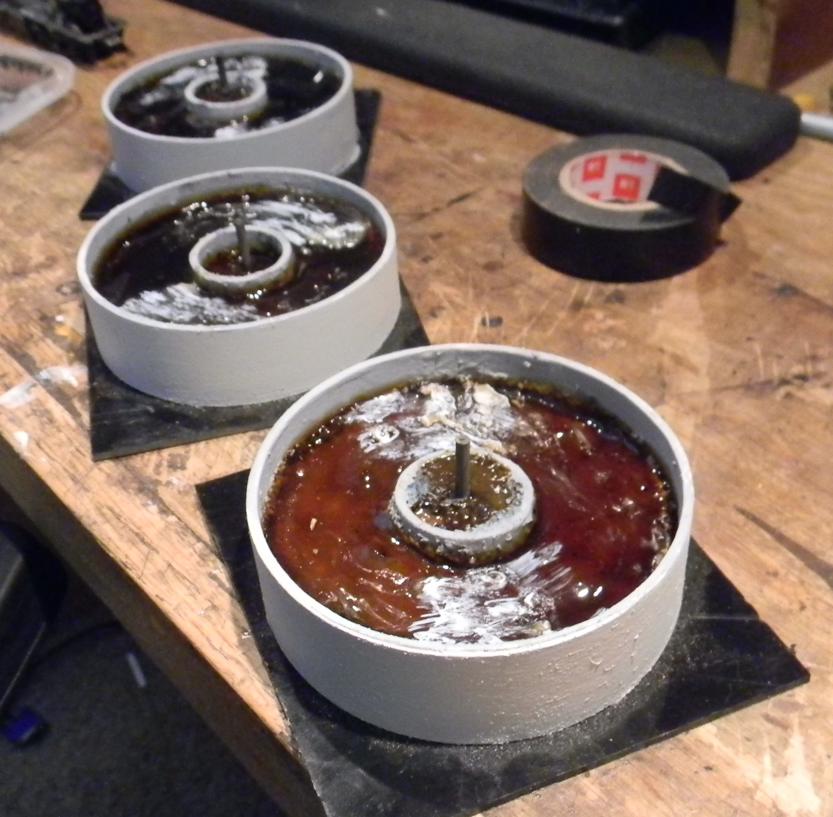
Among the several projects currently ongoing is the blessed sewage treatment plant. I've now filled up the clarifiers with Realistic Water, and I think I already reported that the coffee grounds leached into the water-based poly that makes that stuff work - hence, brown water. I didn't particularly want brown water in all three clarifiers, but I'm not starting for scratch. Added some water effects to show movement of water and hit the high points with some white paint. Ready for pipe and walkway installs...
Posts: 1,442
Threads: 22
Joined: Jun 2022
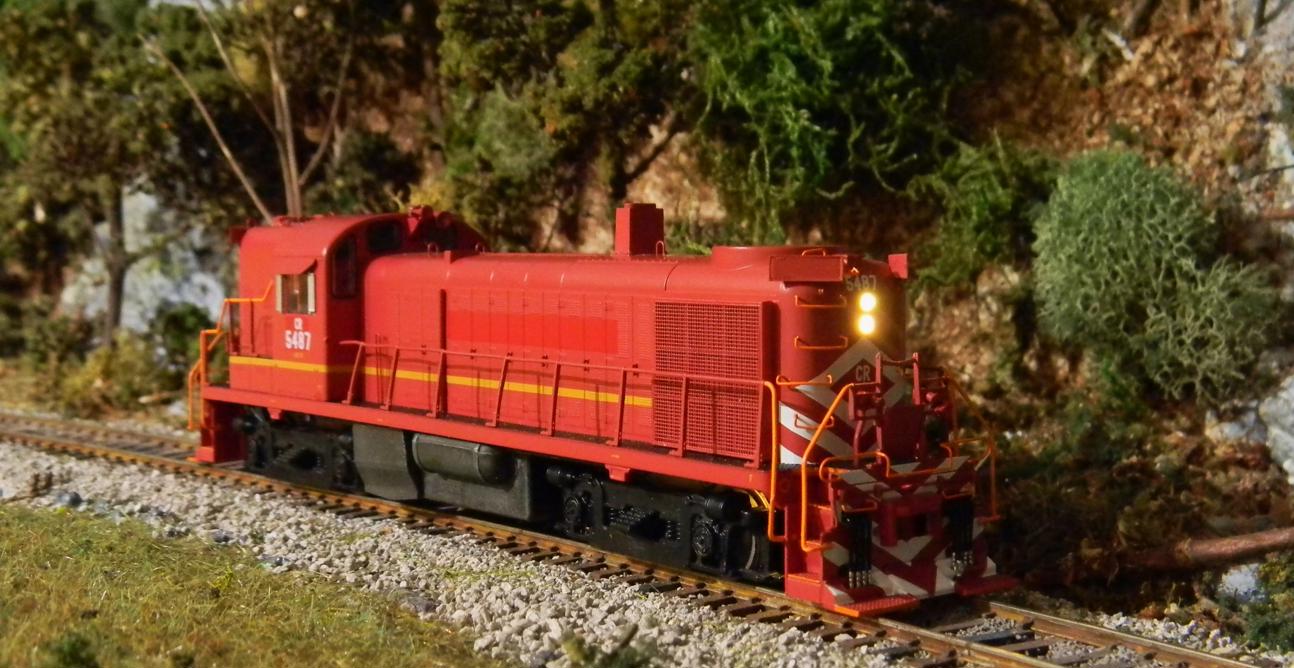
The rain puttered along through the afternoon and even though I got drafted for vacuume duty, I was able to wire up a decoder to the Roundhouse chassis that will house my RS3 Hammerhead. Got everything loosely connected and put it on the track - forward, backward, light on backward.... no light forward. Hmmph...
Could have been either side of the LED hookup, so I picked the easy (negative) side. Did a continuity check between the decoder plug (white pin) and the negative LED lead... Nothin'. Checked the solder joint after peeling back the shrink tube - looked fine. Hit it with the iron and freed it up. Still no continuity between the end of the wire and the plug! Checked for a break in the wire - seemed fine. Checked continuity between the front of the plug and the back - all good... Wiggled that white wire at the connector and .... pop. Out it came. Bad crimp apparently. Popped the empty socket out the back side and attempted to solder to the back of it, but it's really too small to solder to. Since the green pin isn't functional in this decoder I popped that socket out and plugged it into the "white" socket of the connector, resoldered and shrunk to the LED and FINALLY - up and running.
Got things buttoned up but didn't install the couplers yet - still have that weathering to do, but the junior Frankenstein seems to run well by itself. All hail the Hammer!
Posts: 11,123
Threads: 251
Joined: Dec 2008
Two thumbs up for sure. It keeps things interesting when something that should work doesn't.
Charlie
Posts: 295
Threads: 6
Joined: Jun 2011
(08-16-2026, 06:23 PM)TMo Wrote: FINALLY - up and running.
Got things buttoned up but didn't install the couplers yet - still have that weathering to do, but the junior Frankenstein seems to run well by itself. All hail the Hammer!
Looks great!
Posts: 1,442
Threads: 22
Joined: Jun 2022
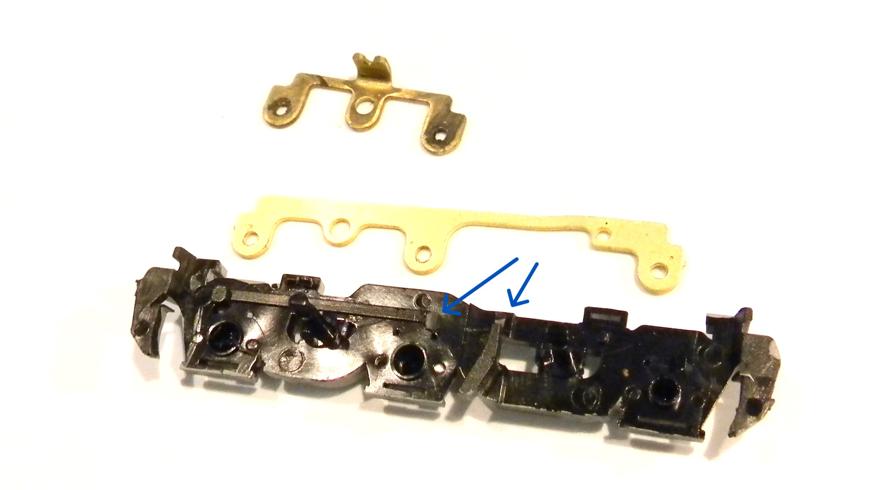
Had a little bit of time tonight and decided to break out the 3-axle pickups for my Stewart C628/C630 fleet that came in the Bowser order. The pickups ($3 each) seem to make these locos a lot more consistent at picking up track voltage with every wheel assisting.
The photo below shows the old 2-axle pickup at the top, the new 3-axle design in the middle and the altered Stewart side frame - you have to remove some plastic with a sharp knife (the arrows show where in order for the pickups to sit flush against the side frame of the truck). I'm replacing in my soul remaining D&H C628 first, the Reading C630 will come later.
Posts: 1,442
Threads: 22
Joined: Jun 2022
The treehouse construction has pushed all of the inside work off the plate until tonight when we got some decent rain. I also needed to clean off my desk prior to the arrival of my granddaughter tomorrow. She's an inquisitive 3 and can get into some things that I don't really want her to get into.
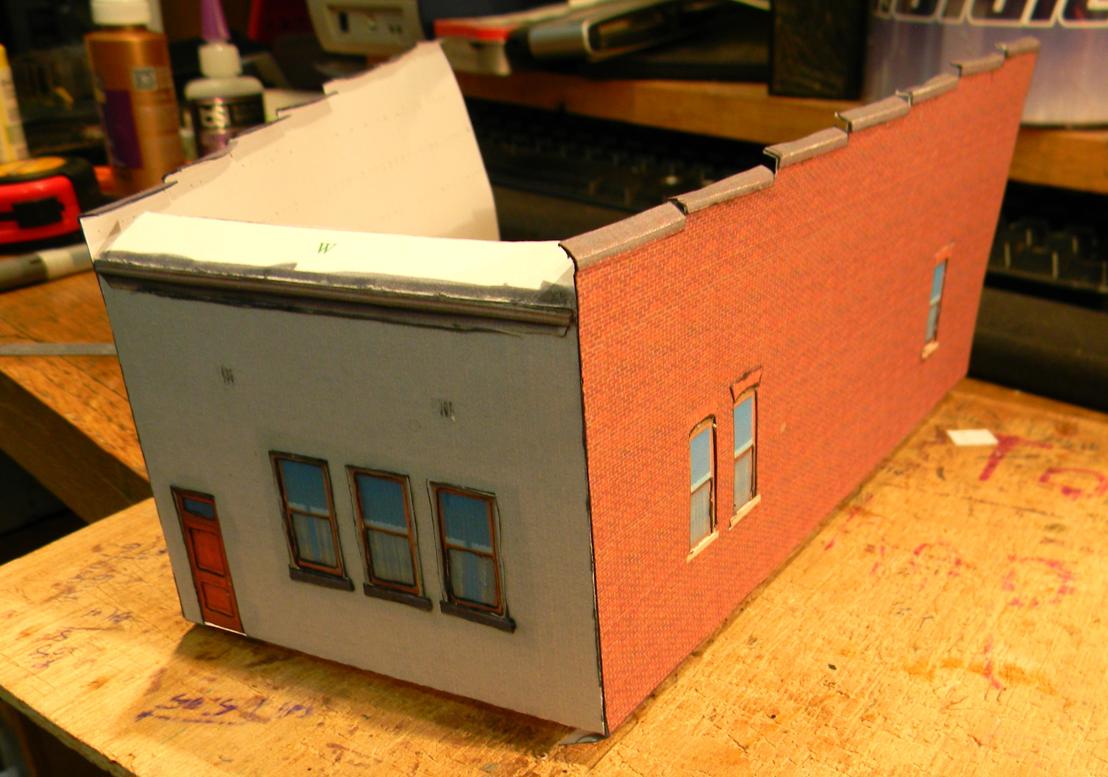
There were a ton of cardstock sheets associated with the bank job, so I decided to at least get the 3rd side on the bank, with the "money" or street side left to construct.
Posts: 1,442
Threads: 22
Joined: Jun 2022
The money side of the bank...
Thought I'd take some time to show how it's possible to add a bit of depth to some of these free cardstock models from the Illinois Historic Preservation Agency, (IHPA) and like I said when I completed the back side, the Clever models do this through multiple prints of specific detail parts in the assembly. For these freebies, I just had to print multiple copies of each page to get the pieces I needed.
For instance, here's the front face of the bank right out of the printer, and the IHPA instructions just have you cut out the front face of the building and fold it with some appliques over the awning covering the doorway and the cornice at the top of the building, and the center section (the doorway and windows) fits inside a larger front face (on the left of the page). After assembly, there's some depth to the front of the building, but I think I can do a little better.
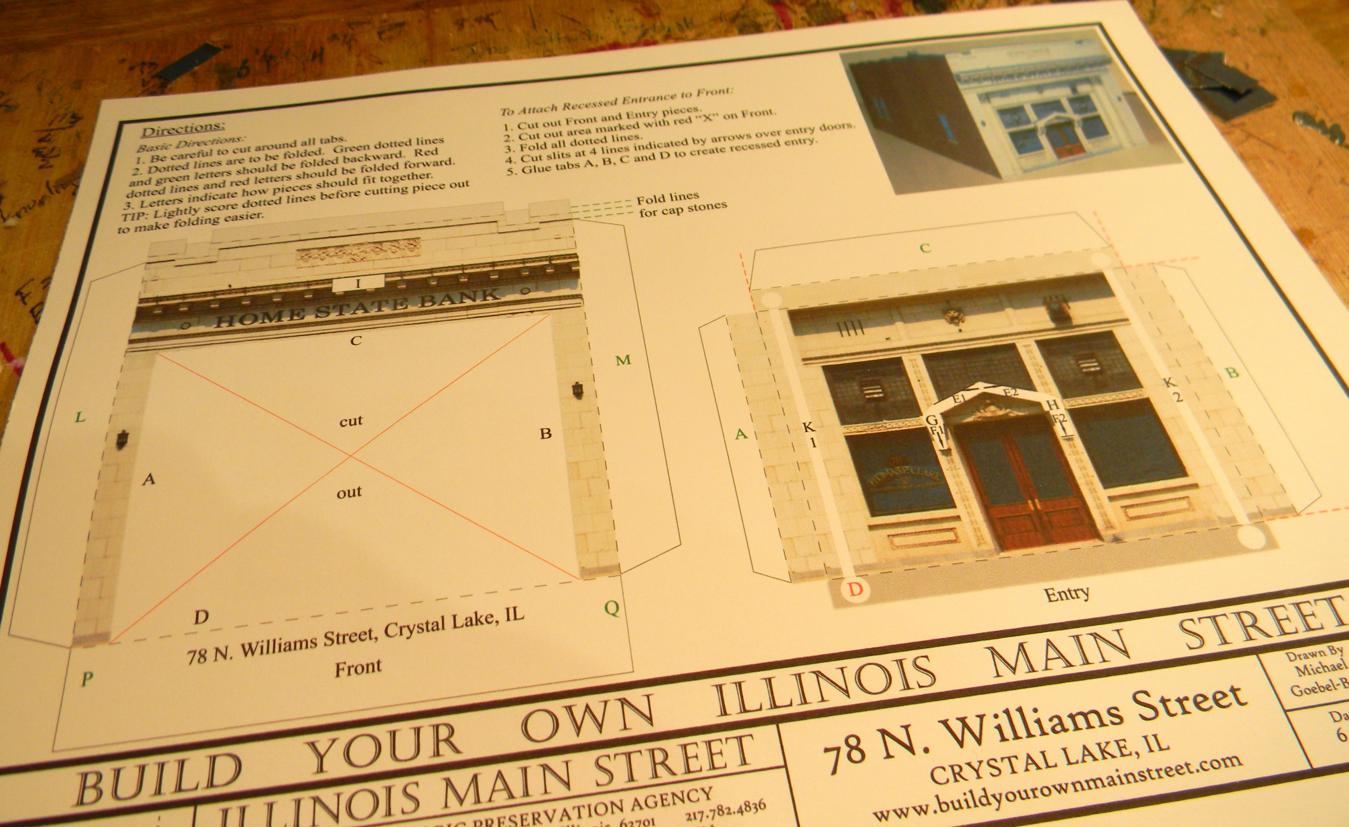
For example, the doorway and the windows and some of the decorative trim below the windows are inset from the protruding front facade. Even the door panels and the windows in the door are deeper than the doorway. So, I took a base layer of the front center section and cut out those areas (and saved the pieces for later):
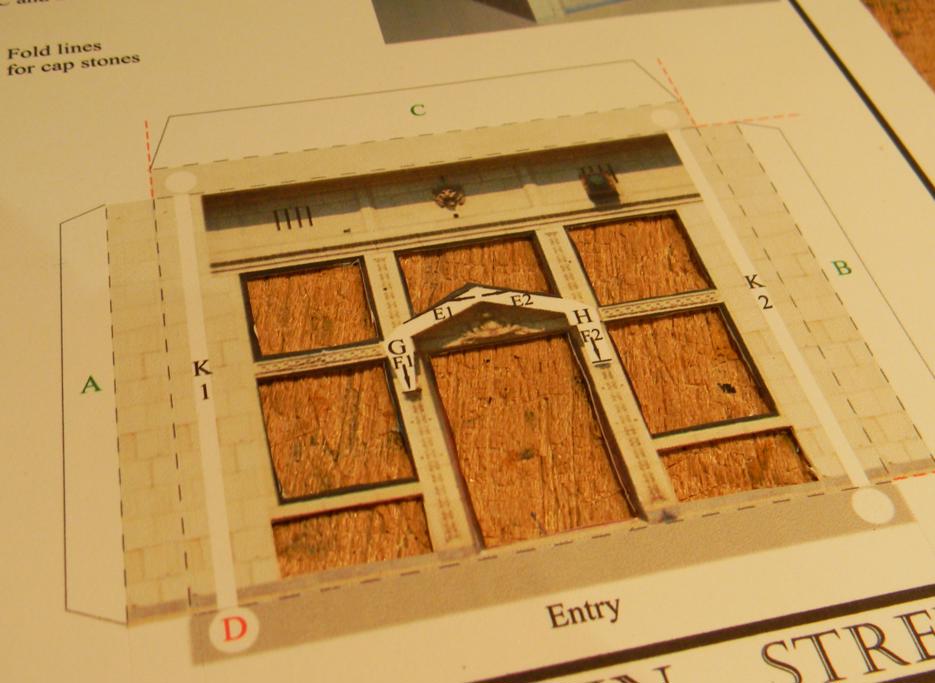
Then I took a brand new sheet and cut out the inserts for the door panels and the windows and a couple other indentations.
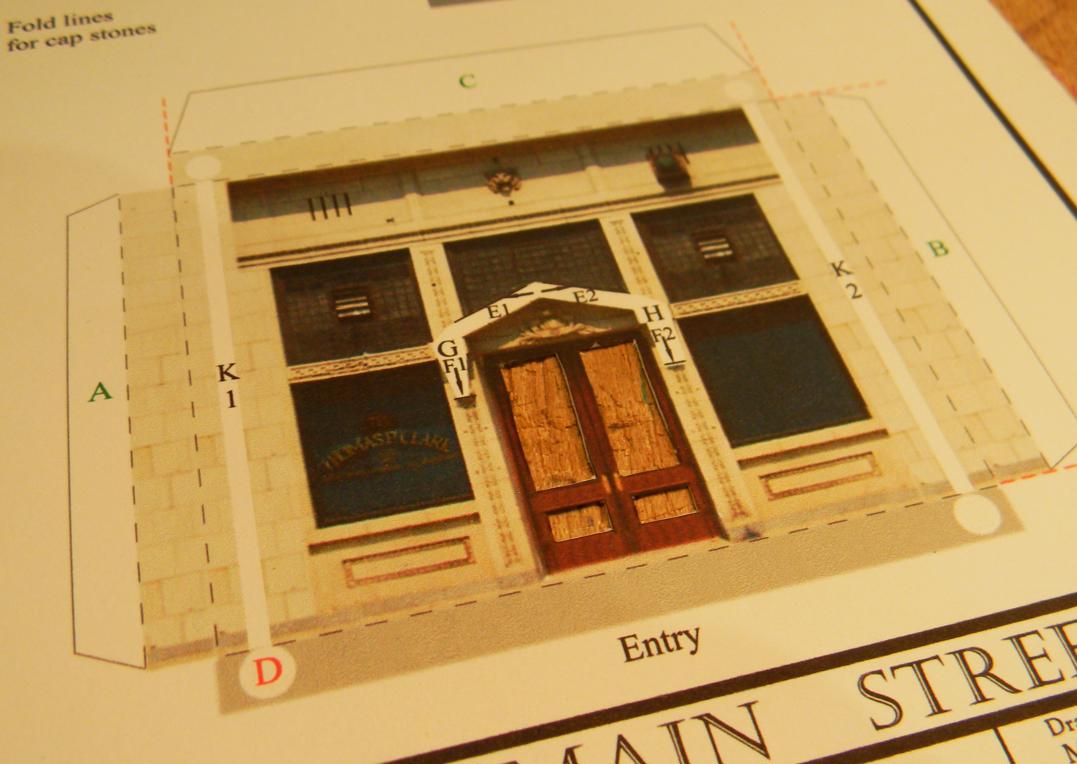
Then I took those pieces I cut out of the main layer and (after taking a marker to the cut edges to tone down the white paper), glued them under the sheet with the cut door panels, etc.
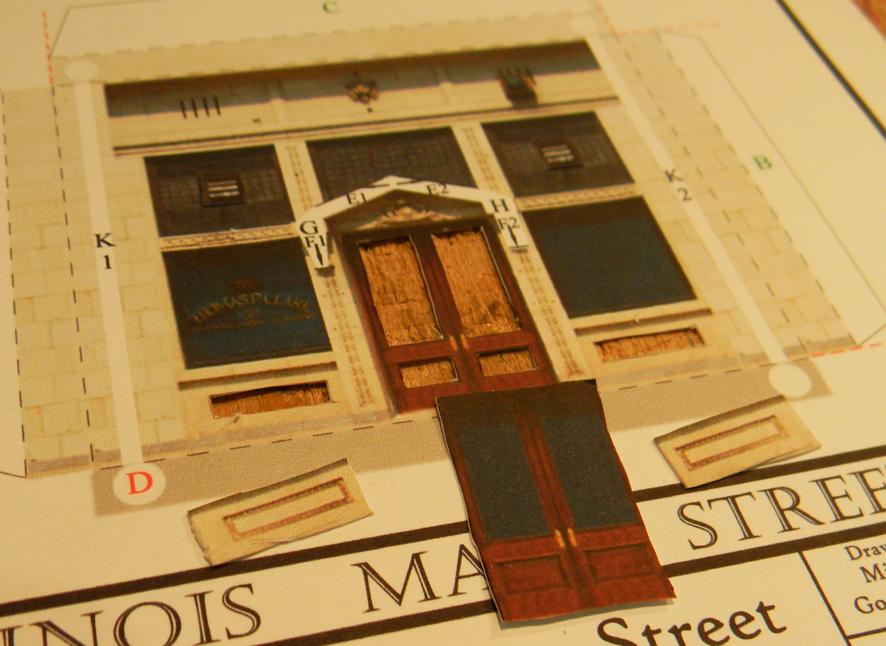
I then cut out the center section of that new mult-layer assembly (along the blue lines in the picture below) and glued that under my main layer.
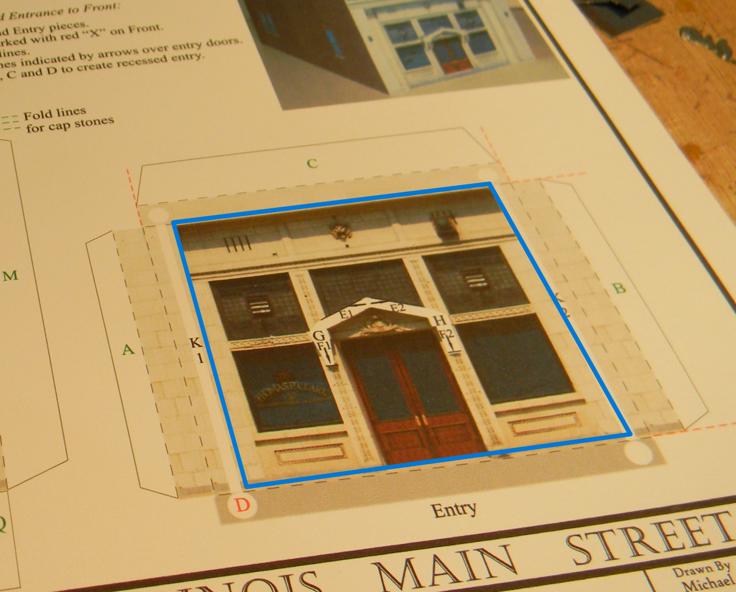
Here's the finished product of the center section with the 3 layers of cardstock - I still have to fold it up and incorporate it into the other portion of the large wall and add the extra cornice work and sections of awning above the front door, but I think you can get the idea of what I've tried to do - add a bit more depth and detail.
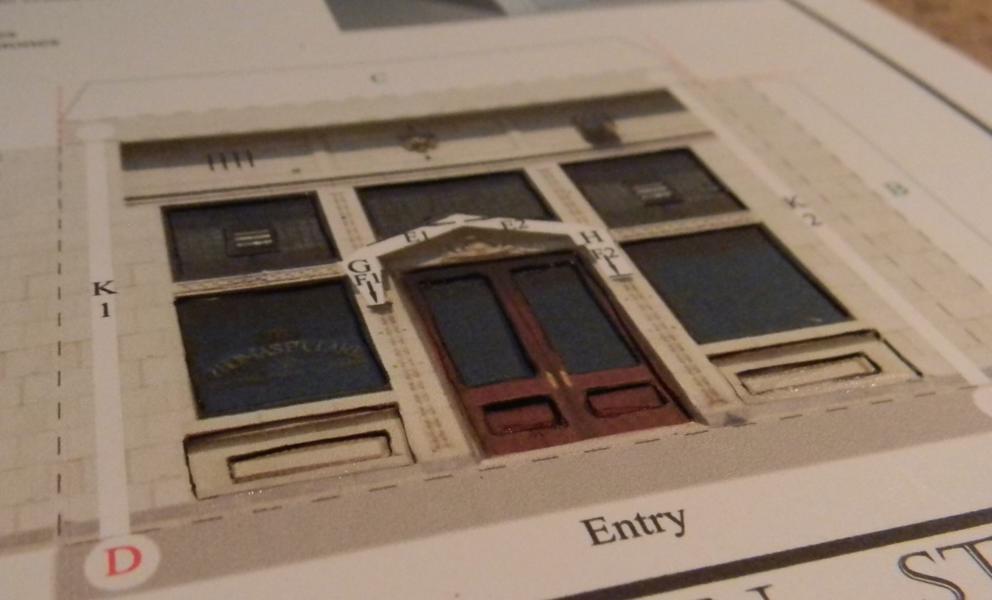
Maybe we'll get some more rain and I'll get this thing finished sometime soon!
Posts: 295
Threads: 6
Joined: Jun 2011
Todd,
this is looking good! definitely gives a 3D look.
Sorry, you may have answered this before, but all in one place here are my questions:
what glue to hold to the backing? Does it wetten the paper & make "bubbles"?
what did you use for the backing?
what method of cutting? it looks like a LOT of cutting... xacto & straight edge, or ????
Posts: 1,442
Threads: 22
Joined: Jun 2022
Hillyard,
Good questions!
- The glue I use is a gap filling 5-10 second hold Cyanoacrylate glue - branding is "Insta-Cure+". I can't take credit for picking this glue - it was recommended by Clever Models and they know what they're talking about. They always recommend "less is more" on glue application - but if there is too much on the paper it does not bubble, and you can scrape the extra with the edge of your knife. This glue comes in two different types of applicators - the more ideal is the long skinny nozzle with a push on cap, but that nozzle does tend to clog after a good many uses, and it becomes problematic as the glue ages and the cap collects glue. The other option is a screw on top, but the hole for glue is a bit larger than the other long skinny nozzle, so you tend to get a little too much glue coming out during application. The good part is that the screw on cap doesn't allow air to get to the glue and it tends to last longer.
- The "backing" is cardstock that I run through my inkjet printer. There are different weights of cardstock, but the general recommendation for HO scale cardstock models is between "60" and "80" pound cardstock. I don't know if it's ream weight or what, but cardstock wrappers will show the weight.
- I use an Olfa knife with a chisel blade - it's the Xacto equivalent, but I find that the Japanese make a far superior blade - Olfa knifes are sold in Lowe's and they come with a pack of about 5 replacement blades. Getting just the blades is much more expensive for some reason, so I just buy a new knife and 5 blades every 6 months or so at Lowe's.
- Each "kit" does require a good bit of cutting, and a straight edge is recommended, but I also do quite a bit of freehand cuts, most of which are mostly straight.
If you're interested in some Expert tips and tricks for cardstock modeling, here's a great link from Clever - http://clevermodels.squarespace.com/tips-tricks/
Posts: 1,442
Threads: 22
Joined: Jun 2022
One of my main Shinohara turnouts failed on me a couple of weeks ago - one of the points detached from the switch rod (the metal between the point and the switch rod fatigued after 20 years of service). I contemplated trying to solder the two metal pieces together while poised over the switch and decided I couldn't make it happen. Before I ripped up the switch and bought another, I got out the epoxy.... With a pretty careful application and some frequent operation of the switch, I think it's functional again. Crossed fingers.
Posts: 295
Threads: 6
Joined: Jun 2011
(08-28-2026, 07:00 PM)TMo Wrote: Hillyard...
- The glue I use is a gap filling 5-10 second hold Cyanoacrylate glue - branding is "Insta-Cure+"...
- The "backing" is cardstock that I run through my inkjet printer...
- I use an Olfa knife with a chisel blade - it's the Xacto equivalent...
- Each "kit" does require a good bit of cutting, and a straight edge is recommended...
If you're interested in some Expert tips and tricks for cardstock modeling, here's a great link from Clever - http://clevermodels.squarespace.com/tips-tricks/
TMo,
Thanks for the how-to. Your project is looking great, looking forward to more as you progress!
|