12-22-2008, 01:08 AM
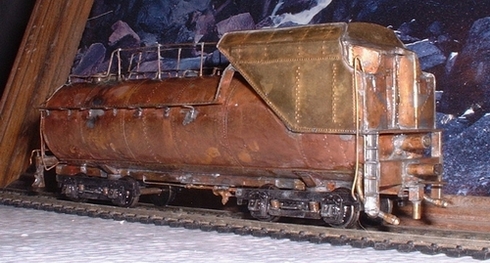
Here is Tender I built, I think it is a B& O prototype. All I remember was seeing the plans & a picture of it in a MR magazine & I fell in love with it! The prototype had barber freight truck on it , I put on freight trucks when I first built it & it looked SILLY. Kinda like King Kong on a set of Barbies legs!! So I know it has the wrong trucks but I don't care.
To make matters worse I built this to put behind an Arbour 2-6-6-6 kit that I salvaged from a garbage can! It had no tender but was mostly there , boy what a POS kit it was !! I built a new pilot deck & had to scratch about half the valve gear because it was very poor & fragile pot metal.
The main tank of this is a piece of Copper water pipe, With .004 sheet copper soldered as an overlay, thats why the big hole you can see inside the coal bunker-- every time it hit it with the torch to solder it, it blew the ends off till I put the hole in it! Durn thing weighs a ton!
On the front view , see the two water delivery pipes coming out ? Notice the "Ball" shape on them , the pipes are insulated from the rest of the tender & the wheel pickups feed them & they hook into the loco by a modified split gold bead on the power transfer wire to the motor, it "snaps over the ball. Works real slick & no wire to try to hide! The wire looks like a water transfer line.
Heres a trick I used to form the ends of the tank. I got 2 of the old "concave or Flat" type freeze plugs for engine blocks, soldered a piece of brass ( on what would be the inside surface) to one freeze plug, put the other over the brass & squeezed them together in a vise ,then heated it enough with a propane torch for the brass to take a set, when they cooled, I trimed & filed the end cap perfectly round using the freeze plug as a pattern.
I have also used much the same procedure on styrene for concave or convex ends.
Instant glue ? ---- SOLDER ---- NOW THATS INSTANT!


![[Image: sig2.jpg]](http://i12.photobucket.com/albums/a246/lginc/vids/sig2.jpg)
![[Image: up_turb10k_r.gif]](http://i12.photobucket.com/albums/a246/lginc/vids/up_turb10k_r.gif)

