Posts: 2,724
Threads: 160
Joined: Dec 2008
Well Randy The Anna lines also has a class of converted coal hoppers much like you described. ![[Image: 20110726195411.jpg]](http://i840.photobucket.com/albums/zz328/gronku2/20110726195411.jpg) They make up a smaller part of the cement conveyor belt than the covered gons..
I started on the hopper chutes by shaving down a angled Lego brick and cutting off the little peg on the top, making a mold of it, and pouring several castings. The last set is still in the mold.

I had to move some of the brake equipment in order to fit the chutes. The top car is stock and the bottom one has the castings installed.

The next step will be to finish installing the chutes and fabricate doors for them.
Here is a pic of the same car at it's present state.

My other car is a locomotive, ARHS restoration crew
Posts: 1,229
Threads: 23
Joined: Dec 2008
Nice use of the Lego! I've heard of using them for the walls of a mold box, but never as the casting masters themselves!  hock:
However, when you mentioned adding hopper bottoms to the cars, I was imagining 8 on each pickle car, since there are 8 hatches and they're spaced pretty far apart. Are you thinking the end hatches would be disused due to lading weight? Or is it a more practical consideration like the hoppers don't fit next to the wheelsets?
Galen
I may not be a rivet counter, but I sure do like rivets!
Posts: 5,180
Threads: 100
Joined: Dec 2008
Posts: 990
Threads: 47
Joined: Jan 2009
A few years ago I modified an Athern 2-bay hopper to a Kaolin car. It is shortened for one segment and it has got a wood roof - built after a plan in MR.
![[Image: cov.hopper_kaolin.jpg]](http://file1.npage.de/004612/18/bilder/cov.hopper_kaolin.jpg)
However I must say that a couple of identical cars will give a good look to a model train. It is nice to see what for different models have been rebuilt to cement cars. Ok. hoppers are the most changed models.
E-paw, good job and a good looking cement car train!
Cheers, Bernd
Please visit also my website www.us-modelsof1900.de.
You can read some more about my model projects and interests in my chronicle of facebook.
Posts: 2,724
Threads: 160
Joined: Dec 2008
I have installed the hatches and finished the hopper bottoms, minus the locking chains on all six cars.

Here 1/2 the fleet on a siding in Easton.
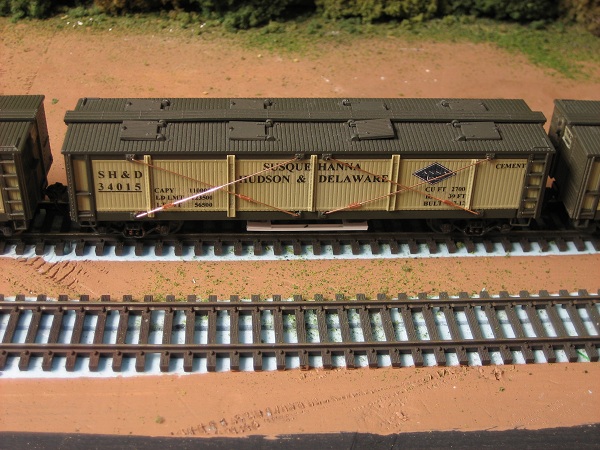
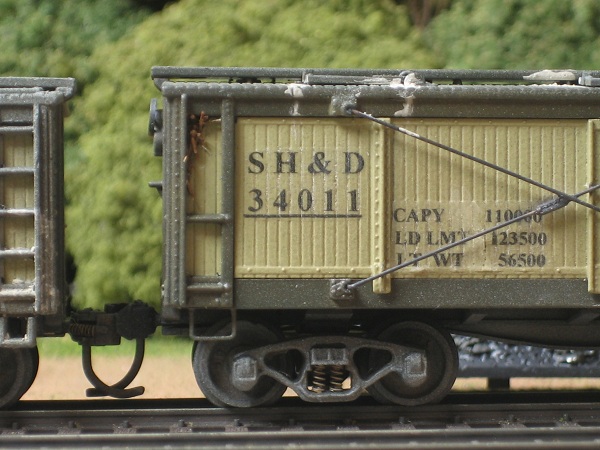
The biggest change that I made to the cars in the last few days are the cross braces on the car sides.

They are some .015 brass wire bent to shape with turnbuckles from Tichy trains. The cross braces and undersides still need paint. At this time only 3 cars have the cross braces installed, because I need to order more turnbuckles.
My other car is a locomotive, ARHS restoration crew
Posts: 5,859
Threads: 175
Joined: Dec 2008
Lookin' good, Steve.   I like that paint scheme, and the turnbuckles on the truss rods are a nice touch, too.
Wayne
Posts: 2,724
Threads: 160
Joined: Dec 2008
All the turnbuckles are in and the weathering is almost complete  . I really wanted to grime these cars up, as they would represent car that have been pressed in to service that should have gotten scrapped. just a few more things and I'll call them finished.

My other car is a locomotive, ARHS restoration crew
Posts: 990
Threads: 47
Joined: Jan 2009
Cheers, Bernd
Please visit also my website www.us-modelsof1900.de.
You can read some more about my model projects and interests in my chronicle of facebook.
Posts: 2,724
Threads: 160
Joined: Dec 2008
My other car is a locomotive, ARHS restoration crew
Posts: 990
Threads: 47
Joined: Jan 2009
Ohhhhhh. Nooooooo!   
Where are the wonderful nice models?
However many more realistic now. Ok, well done!
Cheers, Bernd
Please visit also my website www.us-modelsof1900.de.
You can read some more about my model projects and interests in my chronicle of facebook.
Posts: 2,458
Threads: 57
Joined: Dec 2008
E-Paw...Those are nice looking cars....I like the outside bracing details..... 
On another of your threads there is a "passel" of these cars in the background and I mistook them for pickle cars... I bet you had a hard time understanding a comment I made.... :oops:
Gus (LC&P).
Posts: 2,724
Threads: 160
Joined: Dec 2008
well Steamtrains, you aren't completely off thinking that the were pickle cars because that's what they started out as.
My other car is a locomotive, ARHS restoration crew
Posts: 2,724
Threads: 160
Joined: Dec 2008
I finished up the cement cars today, "  hooray hooray  "!!! The last few things that I wanted to add were the closing mechanism and to fill in some of the damaged sections from earlier.
In this shot you can see the chain type of closure on the hopper bottoms.

I got the idea from a N&W prototype seen here.

My version is just a little less involved. I wanted these cars to represent an older design so I felt they were fitting.
Two of the cars got damaged when I was taking them apart  , The glue just wouldn't give  . So rather than fix them before painting I went with an idea that was used on anthracite cars well into the 50's. As seen here in the upper left cornner.

In order to keep the cars rolling until a proper repair could be made, straw mixed with resin would be packed into holes as a quick fix. To do this I cut some fibers from a straw broom, mixed them in some white glue, and shoved them in. Not all that different from the prototype method.
My other car is a locomotive, ARHS restoration crew
Posts: 2,724
Threads: 160
Joined: Dec 2008
The only other thing to do was sit back, have a beer, and watch the 6 of em run.

With this I'll call them finished.
My other car is a locomotive, ARHS restoration crew
Posts: 2,458
Threads: 57
Joined: Dec 2008
|
![[Image: 20110726195411.jpg]](http://i840.photobucket.com/albums/zz328/gronku2/20110726195411.jpg) They make up a smaller part of the cement conveyor belt than the covered gons..
They make up a smaller part of the cement conveyor belt than the covered gons..
 The next step will be to finish installing the chutes and fabricate doors for them.
![[Image: 20110726195411.jpg]](http://i840.photobucket.com/albums/zz328/gronku2/20110726195411.jpg) They make up a smaller part of the cement conveyor belt than the covered gons..
They make up a smaller part of the cement conveyor belt than the covered gons..


 hock:
hock: ![[Image: P1080288.jpg]](http://i41.photobucket.com/albums/e255/cnnutbar47/trains%20and%20boats%20and%20planes/P1080288.jpg)
![[Image: P1080290.jpg]](http://i41.photobucket.com/albums/e255/cnnutbar47/trains%20and%20boats%20and%20planes/P1080290.jpg)
![[Image: P1080289.jpg]](http://i41.photobucket.com/albums/e255/cnnutbar47/trains%20and%20boats%20and%20planes/P1080289.jpg)
![[Image: cov.hopper_kaolin.jpg]](http://file1.npage.de/004612/18/bilder/cov.hopper_kaolin.jpg)

![[Image: 003-1.jpg]](http://i840.photobucket.com/albums/zz328/gronku2/the%20gauge/003-1.jpg)
![[Image: 004-1.jpg]](http://i840.photobucket.com/albums/zz328/gronku2/the%20gauge/004-1.jpg)
![[Image: 001-4-1.jpg]](http://i840.photobucket.com/albums/zz328/gronku2/the%20gauge/001-4-1.jpg)
![[Image: 002-2.jpg]](http://i840.photobucket.com/albums/zz328/gronku2/the%20gauge/002-2.jpg)


 , The glue just wouldn't give