Rescuing and possibly restoring a Layout section
#1
A model railroader that I knew passed away suddenly a few months ago. He had a fairly large layout, double decked 45X 15' that was very well detailed. I always admired his work and when he passed I wished I could get a section of his layout to use as a diorama, or even incorporate it into my layout. 
My friend and I were wondering what happened to his layout since we weren't involved in the take down on it but a few weeks ago some of his equipment started to show up on Ebay. and this past week the section of the layout that I had always wanted went up for sale. Here's a few pictures of the section 'Hemsley' taken in 2016 while it was on his layout:

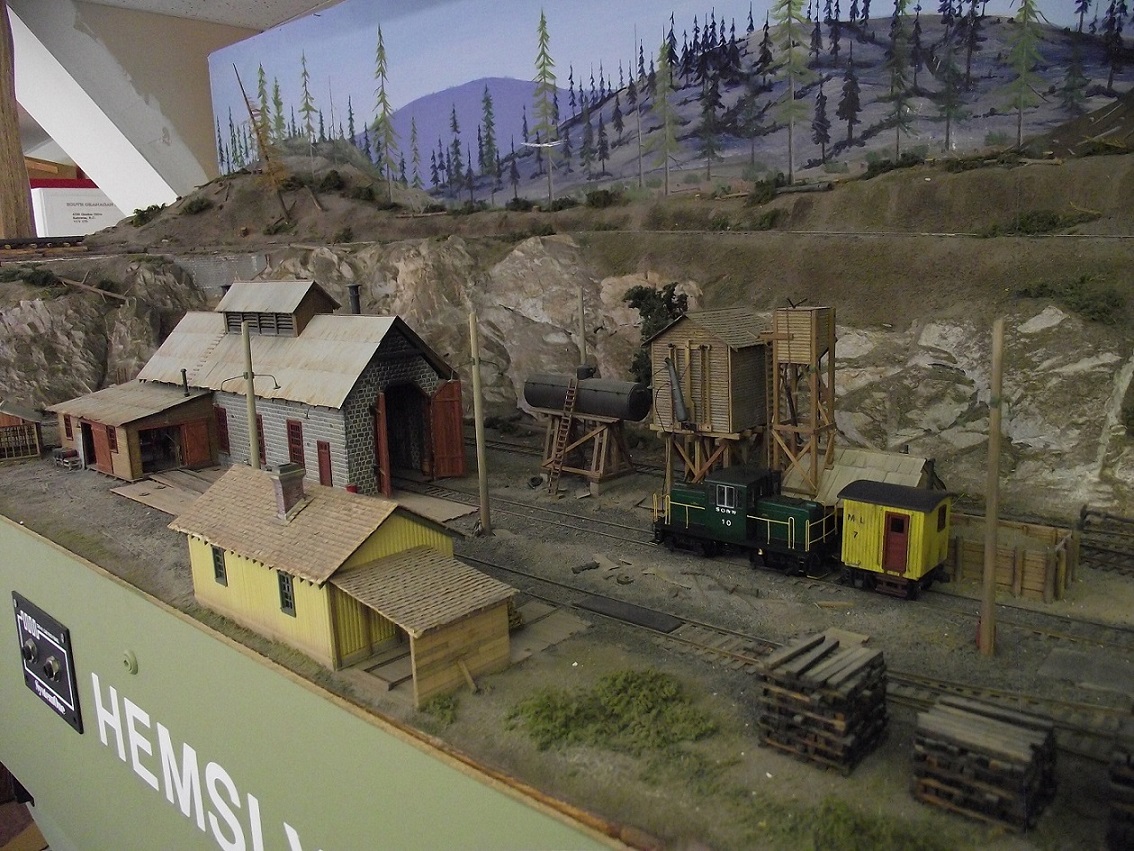


Hemsley was built by another model railroader that I knew and the owner of this layout incorporated it into this one. I believe the structures are a mix of scratchbuilt and Campbells.
Anyway, Hemsley was for sale for the low price of 26$ and I only had to think about it for about 3 seconds before hitting the 'buy in now' button. Yesterday My friend and I drove about an hour away to pick it up. This is what I got:
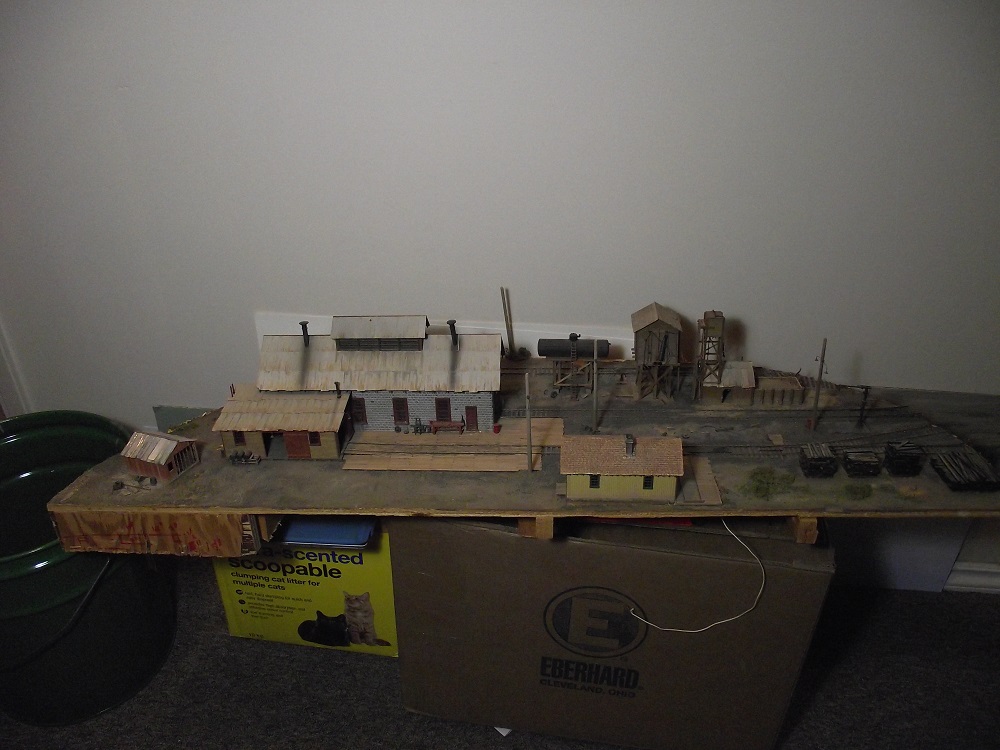


The section is 41X15" unfortunately it was removed with either a Jig saw or Sawz-all and the sides and back cuts are a bit butchered as well as the track.
Reply
#2


The engine house and attached machine shop have full interiors. 


The enginehouse has a removable roof and an inspection pit inside. The main door hinges also work.


I noticed from the 2016 photos that there was a lean-to beside the yellow building that is now missing. I may have to replace that.


Both turnouts have switch machines attached and the track is all wired. 
That being said, I'm not sure what to do with the diorama. I could pry all the structures off and add them to my layout, but the engine house might not cooperate.
To restore it would take quite a bit of work. I'd need to replace the cut-off corners, relay the track and try to match up the scenery.. A number of the buildings need to be repaired as well.  
It would make a very nice photo diorama though.
Reply
#3
You made a great buy and I am sure you can make it look like it was a part of your system without doing a whole lot of work to repair all the damage, and the benefit of something you have admired and a reminder of your friend. I am very happy for you. I have a few buildings given me by a friend when he moved 30 years ago. He passed away 20 years ago yet his memory lingers on my layout. 
Charlie
Reply
#4
To repair it I would suggest attaching it to a piece of plywood that is squared off and then build around the damaged edges a couple inches, then you would be able to have a nice diorama that you could build in. I think it would be a shame to try to remove things.  If there is wiring or items underneath the section you bought you could make a plywood frame so only the edge areas can be repaired leaving access under the original section. If you look at it as repairing one thing at a time it isn't so overwhelming and it will add to you modeling pleasure. 
Charlie
Reply
#5
Thanks Charlie, that's what I plan to do. I already have a 1/2" piece of plywood that I will attach to the bottom so I can begin to square things up again. 


This is the bottom of the diorama. I plan to remove the wiring and switch machines as they won't be needed anymore. I'll also remove the remains of the framework so I can attach the 42x16" piece of plywood. I will have to cut a relief in the board for the engine house inspection pit that you can see towards the right.
Reply
#6
It strikes me as unusual that the framework has been attached using screws driven from the underside of the plywood.  The usual practice is to build the framework, then screw-on the plywood table-top from above.  It almost suggests that the original builder may have intended portions of the layout to be removeable, with no need to hunt for screw locations buried beneath scenery and structures.

Wayne
Reply
#7
As I mentioned before, this section was built by another modeler and later incorporated into the layout. I assume that the 'module' was completely sceniced and had the structures permanently attached before installation. At any rate, it makes my job a whole lot easier this way.
Reply
#8
Progress has been made:
   

It took a bit of effort but I managed to clear the bottom of the wiring, switch machines and the remains of the old benchwork. There was only one piece that had been screwed in from the top and that meant only two screw holes to fix later. 


I then made the new repair/patch pieces by cutting a new 16X42" base to square things back up, and then cut the patch for the back to bring everything to the same level.  I cut the relief hole in the bottom for the inspection pit.


And it fits! Well, not perfectly but that's what wood filler is for. I'm taking the new base to work tomorrow for a final squaring up on our panel saw and them I can screw the original section down to the new. 
Then I can look into restoring the trackwork and scenery.
Reply
#9
After bringing the new base home from work yesterday, I found that I had assumed that the original base was 1/2" plywood when it was only 3/8". To bring it up level, I had to make a 1/8" filler and tack and glue it overnight:
   

Then I was able to screw the original part and my new base together from the bottom, using 1" countersink screws.


I suppose my next project will be to fill the gaps between the old and new, but first I was looking at the old trackwork. It's all code 70, hand laid.
   

Most will be easy to repair, just straighten some of the rails, add some extensions to the edge of the diorama, and call it done. But the rearmost track is a different story.


Most of the rails are badly damaged and will be needing replacement. When I was contemplating this I thought, why not just replace the entire rear track with something a bit different.
   

I have this old Shinohara Dual gauge turnout that is a exact match for the current one. I'm thinking of relaying the rear track in dual gauge so I can display some of the narrow gauge equipment as well.
Reply
#10
You have done a fabulous job thus far and the dual gauge will add greatly to the scene.  Will you be able to just add the center rail to some of the existing standard gauge or will you have to start from scratch? 
It is coming right along and I am enjoying seeing someone else work since I can't get motivated. 
Applause Applause
Charlie
Reply
#11
Thanks Charlie. If only it were as easy as you said:
   

I have already removed the rail, next I'll be removing the ties and ballast. Because I'm going dual gauge and adding the turnout, I figure it will just be easier to relay the whole stretch of track. removing the old track will also make it easier to fill the gap between old and new and the ties will match.
Reply
#12
I cleaned up the remains of the rear track
   

I had the use a wood chisel to remove the ties. I thought I might have gotten lucky and they had been glued in with white glue but when I soaked them with water, only the ballast and surrounding scenery came up. After the chisel I sanded the area smooth and somewhat flat.
   

I then filled the gap between old and new with some caulking and I'm waiting for that to dry before starting to relay the track. It's taking  a bit more time than I thought to get to the actual rebuilding stage, but it's worth it to do it right.
Reply
#13
You are doing a great job. I can't imagine how nice this will be when it is finished
Charlie
Reply
#14
Thanks Charlie
I re-laid the tack over the past couple days.
   

I started by gluing the turnout in place with some latex caulking, then making some tie strips with my home-made tie jig.


Ties were glued into place and dried over night


I then hand-laid the dual gauge tracks. it took a couple hours to do the 3 1/2" of track. I ended up re-using what I could of the original rail, plus some other code 70 that I had laying around. I had just enough plus a bit to repair the other three tracks.
   

I have glued the ties down for the other three tracks but haven't gone further. Those are going to be a different challenge as the rail has been pulled up with the scenery still intact.
Reply
#15
That is some phenomenal model work!
————————————————————————————
Modeling the East Broad Top as it was between 1937-1942
~Amanda
Reply


Forum Jump:


Users browsing this thread: 1 Guest(s)