| Welcome, Guest |
You have to register before you can post on our site.
|
| Online Users |
There are currently 456 online users.
» 0 Member(s) | 451 Guest(s)
Applebot, Baidu, Bing, Facebook, Google
|
| Latest Threads |
2026 Big Blue NASCAR Raci...
Forum: Lower Berth
Last Post: dwight77
25 minutes ago
» Replies: 72
» Views: 12,599
|
The Hobo Camp Fire Is goi...
Forum: Hobo's Camp
Last Post: FiatFan
2 hours ago
» Replies: 305
» Views: 43,300
|
Current Projects
Forum: HO Modeling
Last Post: LiveSteamer
10 hours ago
» Replies: 479
» Views: 279,108
|
Tail End Tuesday
Forum: Shutterbug area
Last Post: tompm
11 hours ago
» Replies: 460
» Views: 424,391
|
Trains This Day/Month in ...
Forum: Shutterbug area
Last Post: Charlie B
Yesterday, 09:03 AM
» Replies: 1,187
» Views: 569,721
|
Remaking of the Ridley Ke...
Forum: Layouts
Last Post: tompm
08-24-2026, 09:43 PM
» Replies: 307
» Views: 346,746
|
Northern Alberta Railway ...
Forum: HO Modeling
Last Post: cnrglen
08-23-2026, 05:40 PM
» Replies: 13
» Views: 1,015
|
CN Blackwater division
Forum: Layouts
Last Post: cnrglen
08-23-2026, 09:10 AM
» Replies: 199
» Views: 242,330
|
Here's the new and improv...
Forum: Stop here and say "Hello"
Last Post: ngauger
08-23-2026, 08:25 AM
» Replies: 206
» Views: 77,991
|
SIDE SHOT SATURDAY
Forum: Shutterbug area
Last Post: Charlie B
08-22-2026, 06:43 PM
» Replies: 753
» Views: 453,315
|
Photo Fun August 2026
Forum: Shutterbug area
Last Post: tompm
08-21-2026, 07:54 PM
» Replies: 7
» Views: 385
|
searching
Forum: Upper Berth
Last Post: jim currie
08-21-2026, 05:47 PM
» Replies: 2
» Views: 108
|
Charlie b's layout
Forum: Layouts
Last Post: TMo
08-19-2026, 06:16 PM
» Replies: 1,336
» Views: 674,080
|
Remember the Good Old Day...
Forum: Lower Berth
Last Post: BR60103
08-17-2026, 06:48 PM
» Replies: 3
» Views: 162
|
Rainbows in the Lehigh Va...
Forum: Layouts
Last Post: TMo
08-17-2026, 06:46 PM
» Replies: 698
» Views: 519,568
|
|
|
| doctorwayne's Get off yer duff Challenge (Part III) |
|
Posted by: doctorwayne - 01-12-2017, 02:14 AM - Forum: Contests & Challenges
- Replies (24)
|
 |
My original intention was to group all of my freight car projects into Part II of my Challenge, but I think that these scratchbuilt cars might be dealt with better in a thread of their own.
My plan is to build four freight cars pretty-much from scratch although I'll use commercially-available stuff where I think it would be better than what I can do on my own, or where it's more convenient. Trucks and couplers fit into those categories, as do detail parts. My aim is to create four cars for layout use...perhaps a bit more detailed than most of what I have done, but this certainly won't be a "plant-the-tree-wait-'til-it-grows-then-cut-it-down-and-hand-cut-scale-lumber-cast-my-own-trucks-make-working-brake-gear-and-put-everything-together-with-handmade-bolts-and-rivets" kind of scratchbuilding.
Two of the cars are being built simply because I have the proper lettering for them. Both are available as either kits or ready-to-run, but I want to try a couple of techniques I've not used before, and I think that I can make them as good as, or hopefully better, than can be bought.
The other two cars are both from the same railroad, (but different from both of the first two) and their prototypes are therefore very much related. I do have lettering for them, too, and while at least one of them is available as a craftsman-type kit, I want to see what I can do. The real ones are a bit unusual, but were built in fairly large numbers and many lasted into the diesel age.
Construction for all will be mostly in styrene, but don't expect this thread to have daily updates. When there's been progress made, I'll show it here, and my plan is to finish building each car before starting the next.
First up is a 1932 ARA boxcar for the Seaboard Air Line. Atlas makes (or made) a nice r-t-r version of this car, which is quite different from most of the 1932 ARA-designed boxcars which were built (most were built after 1932 but before WWII). I believe Funaro & Camerlengo offers a craftsman-type kit for this car, too.
After researching the prototype, I began by laying out the floor, sides, and ends on .060" sheet styrene. The photo shows the cut-out tabs on the sidesill of one car side and the other side shows the .125"x.125" interior bracing...
![[Image: SCRATCHBUILT%20SEABOARD%201932%20ARA%20B...%20021.jpg]](http://i23.photobucket.com/albums/b399/doctorwayne/SCRATCHBUILT%20FREIGHT%20CARS/SCRATCHBUILT%20SEABOARD%201932%20ARA%20BOXCAR...%20021.jpg)
...I cheated on the centre sill: The prototype used two Z-bars with their upper flanges welded together, and their lower flanges sticking out towards the car's sides. I opted for a pair of solid straight centre sills about .155" high by .060" wide. This was accomplished by using .060"x.125" strips on their narrow edges, with strips of .030"x'060" styrene cemented atop them. No flanges whatsoever - I regretted that, but not until I had already finished applying most of the underbody brake gear.  In light of that, I console myself with the fact that it won't be noticeable once the car is on the layout, although most of that painstakingly-applied brake gear won't be too visible either. In light of that, I console myself with the fact that it won't be noticeable once the car is on the layout, although most of that painstakingly-applied brake gear won't be too visible either.  
Here's an over-all view of the underbody:
![[Image: SCRATCHBUILT%20SEABOARD%201932%20ARA%20B...%20011.jpg]](http://i23.photobucket.com/albums/b399/doctorwayne/SCRATCHBUILT%20FREIGHT%20CARS/SCRATCHBUILT%20SEABOARD%201932%20ARA%20BOXCAR...%20011.jpg)
...and a closer look...
![[Image: SCRATCHBUILT%20SEABOARD%201932%20ARA%20B...%20018.jpg]](http://i23.photobucket.com/albums/b399/doctorwayne/SCRATCHBUILT%20FREIGHT%20CARS/SCRATCHBUILT%20SEABOARD%201932%20ARA%20BOXCAR...%20018.jpg)
![[Image: SCRATCHBUILT%20SEABOARD%201932%20ARA%20B...%20020.jpg]](http://i23.photobucket.com/albums/b399/doctorwayne/SCRATCHBUILT%20FREIGHT%20CARS/SCRATCHBUILT%20SEABOARD%201932%20ARA%20BOXCAR...%20020.jpg)
![[Image: SCRATCHBUILT%20SEABOARD%201932%20ARA%20B...%20019.jpg]](http://i23.photobucket.com/albums/b399/doctorwayne/SCRATCHBUILT%20FREIGHT%20CARS/SCRATCHBUILT%20SEABOARD%201932%20ARA%20BOXCAR...%20019.jpg)
While it's certainly not the calibre of what my good friend Bernhard does, that's about as far as I want to go for a layout quality model.
Here's the sides and ends assembled...
![[Image: SCRATCHBUILT%20SEABOARD%201932%20ARA%20B...%20026.jpg]](http://i23.photobucket.com/albums/b399/doctorwayne/SCRATCHBUILT%20FREIGHT%20CARS/SCRATCHBUILT%20SEABOARD%201932%20ARA%20BOXCAR...%20026.jpg)
...and with the roof (from Red Caboose) temporarily set in place...
![[Image: SCRATCHBUILT%20SEABOARD%201932%20ARA%20B...%20025.jpg]](http://i23.photobucket.com/albums/b399/doctorwayne/SCRATCHBUILT%20FREIGHT%20CARS/SCRATCHBUILT%20SEABOARD%201932%20ARA%20BOXCAR...%20025.jpg)
...and the floor/underbody in place...
![[Image: SCRATCHBUILT%20SEABOARD%201932%20ARA%20B...%20027.jpg]](http://i23.photobucket.com/albums/b399/doctorwayne/SCRATCHBUILT%20FREIGHT%20CARS/SCRATCHBUILT%20SEABOARD%201932%20ARA%20BOXCAR...%20027.jpg)
The roof will eventually be cemented in place, while the floor will be screwed to the heavy bracing already cemented to the lower portion of the sides.
As an aside to this thread, I realised too late that I had neglected to add the 5/8" pipe (prototype size) for the car's retainer valve, which sits up high on the car's end, near the brake wheel.
The underbody portion of the pipe runs from the AB control valve to, and then alongside, the centresill to the end of the car. I had pre-drilled the frame's crossmembers, before installing them, to accommodate the trainline (brakepipe), but had not done so for the retainer pipe.
While I do have a #76 drill bit (.020") long enough to drill through the bolster on which the truck is mounted, it certainly won't reach any of the other crossmembers. Anyway, I drilled through the bolster, then removed the bit and lined it up to make an attempt on the next crossmember, carefully bending it so that its business end was more-or-less parallel to the bottom side of the car's floor and then very carefully turned the pin vise until the bit was about halfway through the crossmember. The bit was then relocated to the other side of the same crossmember and the feat repeated, surprisingly, with success. I had the feeling though, that somewhere, either in the next crossmember or in the crossbearers (the wider members located beneath what will be the edges of the car's doors) that bit was going to break.
For some reason, it dawned on me that I had some .019" stainless steel wire, and I quickly dug out a length of it, and snipped off the end, using side cutting pliers.
That left the end looking like this...
![[Image: SCRATCHBUILT%20SEABOARD%201932%20ARA%20B...%20008.jpg]](http://i23.photobucket.com/albums/b399/doctorwayne/SCRATCHBUILT%20FREIGHT%20CARS/SCRATCHBUILT%20SEABOARD%201932%20ARA%20BOXCAR...%20008.jpg)
...a mini spade bit, although somewhat distorted. Chucked into a pin vise, the excess length could be left hanging out the handle-end, then simply advanced as needed as each successive frame member was encountered:
![[Image: SCRATCHBUILT%20SEABOARD%201932%20ARA%20B...%20009.jpg]](http://i23.photobucket.com/albums/b399/doctorwayne/SCRATCHBUILT%20FREIGHT%20CARS/SCRATCHBUILT%20SEABOARD%201932%20ARA%20BOXCAR...%20009.jpg)
...shown here, it's already through the previously drilled bolster and has taken a bit of a dip through the first crossmember, which had been drilled through from both sides with the bent bit. It's also gone on to, and through, the next crossmember...
![[Image: SCRATCHBUILT%20SEABOARD%201932%20ARA%20B...%20004.jpg]](http://i23.photobucket.com/albums/b399/doctorwayne/SCRATCHBUILT%20FREIGHT%20CARS/SCRATCHBUILT%20SEABOARD%201932%20ARA%20BOXCAR...%20004.jpg)
Here, the tip is already through the first crossbearer, with only one more to go...
![[Image: SCRATCHBUILT%20SEABOARD%201932%20ARA%20B...%20001.jpg]](http://i23.photobucket.com/albums/b399/doctorwayne/SCRATCHBUILT%20FREIGHT%20CARS/SCRATCHBUILT%20SEABOARD%201932%20ARA%20BOXCAR...%20001.jpg)
The installed retainer pipe, .008" phosphor bronze wire, is just barely visible here, running alongside the centresill where it meets the underside of the car's floor:
![[Image: SCRATCHBUILT%20SEABOARD%201932%20ARA%20B...%20015.jpg]](http://i23.photobucket.com/albums/b399/doctorwayne/SCRATCHBUILT%20FREIGHT%20CARS/SCRATCHBUILT%20SEABOARD%201932%20ARA%20BOXCAR...%20015.jpg)
...I know....nobody's gonna see it after the car gets painted and is running around on the layout, but at least I know that it's there...well, and possibly there will be a few viewers of this thread that will be aware of it, too. 
More to come....
Wayne
|

|
|
| HO Scale brick yard office - progress and how-to guide. |
|
Posted by: danielb - 01-11-2017, 06:39 PM - Forum: Scratchbuilding and kitbashing - All Scales
- Replies (14)
|
 |
As part of the extension to my HO scale switching layout, I needed a yard office building to go along with a heavy metals unloading spur. I've always liked the Walthers yard office, but I'm not paying £25+ for a tiny kit like that.
So I figured I'd make my own, and thought why not make a build thread/tutorial on how I did it. So, here we go!
Materials list:
5mm Black Foamcore board - A3
Cereal Box card
Basswood strips (just in case)
Clevermodels.net Union Hotel Brick
Clevermodels.net Painted Brick
Clevermodels.net Doors and Windows
Clevermodels.net Standing Seam
Clevermodels.net Distressed Cinderblocks
Stage 1 - the core
To make the core of the structure, I cut four squares of the black foamcore board - two 5cm x 7cm, one 6cm x 10cm, and one 5cm x 10cm.
These were glued together to form the walls using extra strength white glue. The taller wall forming the front of the building.
![[Image: IMG_20170111_223010_zpsobwfwyy2.jpg]](http://i1303.photobucket.com/albums/ag144/shaslakais/Mobile%20Uploads/IMG_20170111_223010_zpsobwfwyy2.jpg)
The core was then flipped over, and a roof cut from cereal box card by placing the core flat on the card and simply cutting around it. You could be much neater by using a ruler, but for the core of the structure it's not really needed. I then used an offcut of foam to form a brace stuck to the inside of front wall to stop the roof from sagging.
The roof was then glued in place.
![[Image: IMG_20170111_224431_zpsdcx9jnx0.jpg]](http://i1303.photobucket.com/albums/ag144/shaslakais/Mobile%20Uploads/IMG_20170111_224431_zpsdcx9jnx0.jpg)
![[Image: IMG_20170111_224437_zpsqrye2a10.jpg]](http://i1303.photobucket.com/albums/ag144/shaslakais/Mobile%20Uploads/IMG_20170111_224437_zpsqrye2a10.jpg)
Next, I use cereal box card to form the inner layer of the structure which is glued to the outside of the core to form relief - into this I cut window and door openings - this will become clearer from the photographs.
To ensure that the windows and doors all line up correctly, I lightly score a straight line along the top of where I want the windows/doors to be.
From here I use the cut out texture paper windows and doors as a template to score around, simply held in place with a finger. I then remove the texture papers and cut out the window/door holes using the scored lines as a guide.
![[Image: IMG_20170111_231513_zpstkugn6tm.jpg]](http://i1303.photobucket.com/albums/ag144/shaslakais/Mobile%20Uploads/IMG_20170111_231513_zpstkugn6tm.jpg)
After this, I cut out and stick on the texture paper I want for the walls - in this case Clevermodels Painted Brick. Don't worry about covering up the window and door holes, as this is addressed next.
![[Image: IMG_20170111_232152_zps1iuo1ody.jpg]](http://i1303.photobucket.com/albums/ag144/shaslakais/Mobile%20Uploads/IMG_20170111_232152_zps1iuo1ody.jpg)
Now flip over the wall and cut lines diagonally from corner to corner of each window/door hole...
![[Image: IMG_20170111_232146_zpsmkflpx2x.jpg]](http://i1303.photobucket.com/albums/ag144/shaslakais/Mobile%20Uploads/IMG_20170111_232146_zpsmkflpx2x.jpg)
...fold the newly created tabs inwards and wrap them around the back of the wall layer, like this:
![[Image: IMG_20170111_232338_zps6qnxiqoq.jpg]](http://i1303.photobucket.com/albums/ag144/shaslakais/Mobile%20Uploads/IMG_20170111_232338_zps6qnxiqoq.jpg)
Glue all these tabs down - trimming off any bits that might overlap with other tabs (eg when two windows are side by side). You don't want any of the tabs to be visible when looking at the structure from the front.
Glue the completed outer wall layer to the foam core.
![[Image: IMG_20170111_235950_zpsi3supgrp.jpg]](http://i1303.photobucket.com/albums/ag144/shaslakais/Mobile%20Uploads/IMG_20170111_235950_zpsi3supgrp.jpg)
Place the completed wall face down on your desk and Weight it down with something suitably heavy - like a soda can (other brands of soda are available!  ) )
Repeat this process for all four walls. The completed walls will be shown in the second part of this thread.
I hope the first part of this has proven useful for new modellers, or even modellers new to cardstock structures.
|
|
|
|
| Have any of you done the " quit smoking " thing ? |
|
Posted by: teejay - 01-08-2017, 03:12 PM - Forum: Lower Berth
- Replies (14)
|
 |
I've never smoked cigarettes , never liked the smell , but I was an occasional pipe and/or cigar smoker for many years .....cigars when I could afford a good Cuban cigar ( back when I was working ) .....and a pipe as I approached retirement on a limited income . Both were smoked in conjunction with sitting with a glass of wine or a scotch on the rocks . Very relaxing and enjoyable , with or without company . I supposed I convinced myself that they " weren't as bad " as cigarettes ....probably not true but I've never researched it .
I threw my pipe away about 2 months ago , in part because pipe tobacco reached $27 / pouch with all tha tax our government keeps piling on . So that was that and YES I do miss it but haven't deviated . Pipe replacement for a decent pipe is $75 and up !!
How have any of you made out on the subject ??
T
|
|
|
|
| Granite slabs industry |
|
Posted by: sailormatlac - 01-08-2017, 02:08 PM - Forum: Industries Along The Rails
- Replies (7)
|
|
Hi, I'm trying to figure out how to model correctly a granite exploiting industry. Not the quarry itself, but the siding. The prototype is a large granite quarry specialized in large architectural granite slabs, large sculpted granit blocks and other such products. Unfortunately, I have very little information about from the era it was still rail-served (1970s-1985). My guess is that slabs were packaged and shipped in boxcars while the larger blocks would have been loaded on flats and gondolas using a traveling crane.
Any information is welcomed.
Best regards,
Matt
|
|
|
|
|






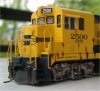
 .... I put the wrong patches on the engine
![[Image: 32139566042_b53e803236_c.jpg]](https://c1.staticflickr.com/1/535/32139566042_b53e803236_c.jpg)

![[Image: 31915705670_4423a47d8a_c.jpg]](https://c1.staticflickr.com/1/505/31915705670_4423a47d8a_c.jpg)

![[Image: 15327446_10154791150163430_1110088787404...9qy9ax.jpg]](http://s1303.photobucket.com/user/shaslakais/media/15327446_10154791150163430_1110088787404335461_n_zpsls9qy9ax.jpg.html)
![[Image: 15439767_10154791150243430_5247991017956...6bmwfc.jpg]](http://s1303.photobucket.com/user/shaslakais/media/15439767_10154791150243430_5247991017956571916_n_zpsnk6bmwfc.jpg.html)
![[Image: 15492510_10154795756618430_4037791488091...rvlbz7.jpg]](http://s1303.photobucket.com/user/shaslakais/media/15492510_10154795756618430_4037791488091926182_n_zpskwrvlbz7.jpg.html)
![[Image: 15380335_10154795756733430_5858106977834...l9zecm.jpg]](http://s1303.photobucket.com/user/shaslakais/media/15380335_10154795756733430_5858106977834065327_n_zpseal9zecm.jpg.html)
![[Image: 15380418_10154795756823430_2571276998995...cki6dw.jpg]](http://s1303.photobucket.com/user/shaslakais/media/15380418_10154795756823430_2571276998995278702_n_zpsl3cki6dw.jpg.html)
![[Image: 15390935_10154795756693430_3952150515022...oyph7i.jpg]](http://s1303.photobucket.com/user/shaslakais/media/15390935_10154795756693430_3952150515022525897_n_zpsy2oyph7i.jpg.html)
![[Image: 15317761_10154795756913430_2853363126946...77nfdm.jpg]](http://s1303.photobucket.com/user/shaslakais/media/15317761_10154795756913430_2853363126946962049_n_zpstr77nfdm.jpg.html)
![[Image: IMG_2531b.jpg]](https://2.bp.blogspot.com/-KylIZuI2kW8/WFiYYwS9ugI/AAAAAAAADcY/apN0v6e5e3QAuwPwj9bC3jHnHHWrcJHQACLcB/s1600/IMG_2531b.jpg)
![[Image: IMG_2661b.jpg]](https://1.bp.blogspot.com/-imj_ra7OMCo/WFiYYy_qF3I/AAAAAAAADcU/iP7h_G7gJJMFWTL5XOtLXJF_LN3a2Ii8wCEw/s1600/IMG_2661b.jpg)
![[Image: IMG_2663b.jpg]](https://4.bp.blogspot.com/-s2YdKv3b1l0/WFiYabBqEpI/AAAAAAAADcg/ytpZda64cRsbwuzkFc4vRsCVRPM_n4McACEw/s1600/IMG_2663b.jpg)
![[Image: IMG_2670b.jpg]](https://1.bp.blogspot.com/-c45QmG_ESw0/WFp1e3sIWsI/AAAAAAAADdI/Hu_jId205CUb0L998cn0v2WaWgYfudySgCLcB/s1600/IMG_2670b.jpg)
