Juneco Two stall enginehouse
#16
Thank you Amanda

I finished the tracklaying this evening:
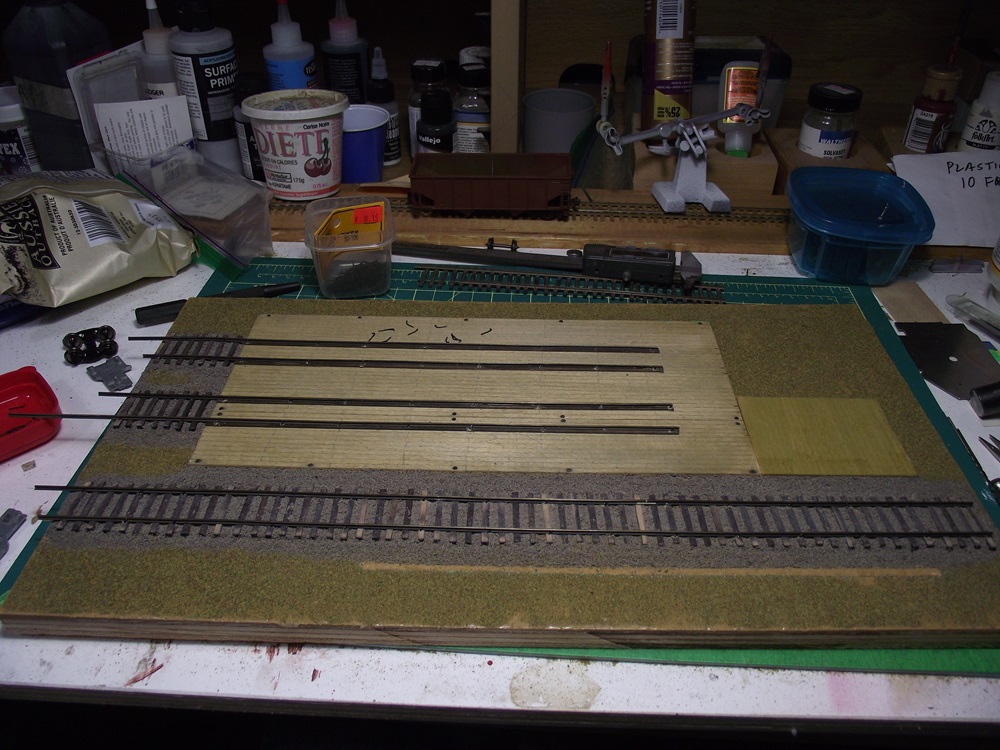
   

It's a bit of a chore, but I don't mind it. I'm leaving the overhanging rail until the model is placed into the layout. Then I can trim them to fit. The next part is to add feeders to the rails before I start putting the structure up around them.
Reply
#17
I finished off the floor today, soldering in the feeder wires


After dropping the 6 feeders I'll still need the base to sit flat while I'm working on the structure. I found these cupboard bumpers at the dollar store so I can lift the base 1/8" off the workbench.
   

Then I looped and taped the feeders down to the base to keep them neat and organized. I added the bumpers to the four corners.
   

Then I flipped the base over and added wheel stops to the three tracks. I used my airbrush to weather the track and enginehouse floors. I wanted to mask the nailheads and solder joints a bit so I used RR tie brown on the sides of the rails and some grimey black between the rails on all three tracks. I'll probably weather some more when it comes time to add the details but this is a good base to start with.


Just a check to see what engines would fit. Since I'm mostly early diesel era I grabbed an F-3 and an SD-7. They both fit and I'm not concerned that I can't put more than one loco on each track as my turntable isn't long enough for more than one either.
Reply
#18
Looking good glen. Looks like the engines fit perfectly in there.
Matt
I can smell a steam post ten blocks away and when I do clear the tracks because the steam express will be hi ballin through
http://cambriaindiana.weebly.com/
Reply
#19
Thanks Matt

I started building the walls today:
   

There are several full size diagrams that I photocopied to use as templates. I glued the first wall framing together using pins to hold it in place. I'll be building the second wall framing next, then the board and batten siding.
Reply
#20
Sorry I haven't updated the build for a bit. Life got a bit hectic and I had to take a week off.
Anyway, I finished the side walls. 
The Board and Batten sheeting comes in three parts per side. 
   

I taped the three parts together and marked out the window and door openings.


The windows and doors are cast metal with a fair amount of flash. I quickly cleaned one of each up to use as a test piece as I cut the openings on the walls.


Even though I cut the openings exactly the size of the drawings they still needed to be opened a bit more but in the end they were all a fairly snug fit.


Then it was just a matter of glueing the siding to the framing. after setting the panels down on the frame a applied weights to the walls so they will dry flat. 


The instructions say to stian/paint the wall now but I'll wait until I have all the walls built up before I do that. 
Next, the end walls.
Reply
#21
Looking good so far.
Tom
Silence is golden but Duct tape is silver
Ridley Keystone & Mountain Railroad
My Rail Images Gallery
Reply
#22
This is awesome Awesome

Lutz
Reply
#23
Making good progress.
Matt
I can smell a steam post ten blocks away and when I do clear the tracks because the steam express will be hi ballin through
http://cambriaindiana.weebly.com/
Reply
#24
Great progress! Reminds me of building balsa wood towers when I was a kid in school.
————————————————————————————
Modeling the East Broad Top as it was between 1937-1942
~Amanda
Reply
#25
Thank you everyone.
I built the front and rear walls next:
   

I used photocopied cutouts of the plans the cut the board and batten walls out as well as the two front doors. The kit originaly has a large door in the rear but that won't work for the location that I'm using so I just left it out.


I then built the interior framing, much like I had built the side walls.

I added the large door frames.


Then I finished assembly by gluing the walls the the framing. The small door will be the access to the office which I'll be building soon.
After the main walls to the enginehouse were completed, I built the large doors.


The doors are built off the same photocopied plans using some scotch tape to hold things together as you glue. The main door panels are each made of 8 individual boards that you glue the framing to.


And the finished 2 sets of doors. 
Next, the car shed wall and office.


Attached Files Image(s)
   
Reply
#26
Coming along smooth!
————————————————————————————
Modeling the East Broad Top as it was between 1937-1942
~Amanda
Reply
#27
Thanks.
I finished off the wall construction a couple days ago.
   

Pictured is the car shed wall and the three offie walls. They are built with frame on siding, just like the enginehouse walls. 
I'll be adding color soon.


Before I started building the walls up, I wanted to finalize some of the wiring on the bottom of the base. I built a home-made terminal block on the bottom so I could connect two polarities to a single conection.


Finally, I cleaned up all the window castings. It took awhile with the three files you see and there was a fair amount of metal dust after the fact. I do admint it was a bit tedious but I watched a model rr podcast while working.
Reply
#28
Which podcast do you like to watch/listen to while you work?
————————————————————————————
Modeling the East Broad Top as it was between 1937-1942
~Amanda
Reply
#29
I listen to 'A Modeller's Life' and a Youtube channel called 'Thunder Mesa Studio'
Reply
#30
I did some experimenting with color today, using some cut off pieces from the kit:


I stained three of the pieces with an india ink and alcohol solution.


Then I colored them with different methods. The large door cut out and the lower left triangle were colored with different shades of chalks, the upper left triangle was colored using depot buff paint, using a semi dry-brush technique.

I'm kind of leaning to the depot buff paint as it seem so hold the color a but more. I have used chalks to color wood kits before but this time it doesn't seem to be doing the trick for me. 
Thoughts?
Reply


Forum Jump:


Users browsing this thread: 1 Guest(s)